Annotations

Label your lesson with edify annotations

Annotations

Annotations are a method of attaching notes to specific areas or models within your lesson. In the future, users will also be able to add audio and video clips to their annotations, enabling them to provide detailed descriptions or context to their 3D models.

Adding Annotations to your lesson

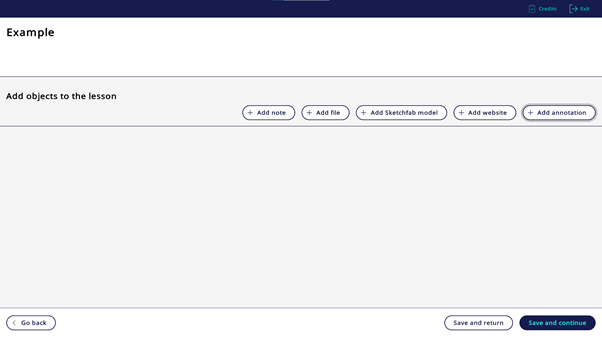
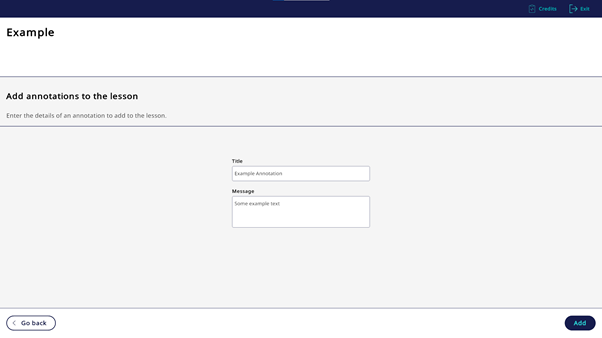
Annotations are added to your lesson from the lesson editing screen, before you enter the lesson itself, using the “Add Annotation” button. You will then be asked to enter a Title for the annotation to be known by, and a Message, which will display when the annotation is selected. When you are finished, press “Add” in the bottom right, and the annotation will be added to your lesson.
Using an annotation in your lesson

When you enter your lesson, you can access any annotations you’ve added by navigating to the “Annotations” tab on the home panel. Here you will see a list of your prepared annotations, filter them based upon whether they’ve been placed in the current scene or are hidden, and delete those you no longer want.

When you have found the annotation you want, you can use the “Place” button to add it to your scene. The annotation will appear in front of you (note, if you are facing the home panel or a wall, the annotation may appear on the other side, as it appears a set distance in front of you).

Annotations are interacted with in the same ways as 3D models. Users can grab the annotation using their grip buttons to move, scale and rotate. Pressing on the annotation pin causes the note to display, with the Title and Message that was entered when the annotation was created.

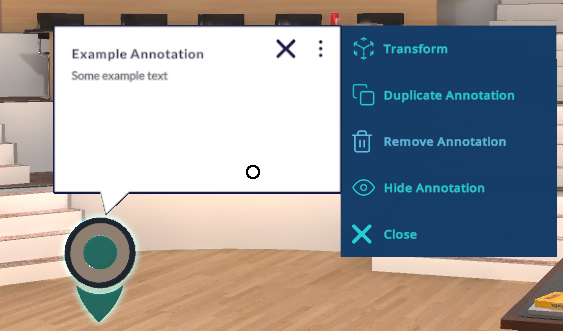
Pressing the Menu button (three dots) in the top right of the note popup opens the annotation’s context menu. Here, the user can access the annotation manipulation tools (if in desktop). They can also duplicate the annotation, temporarily hide it (while retaining its position), or completely remove it from the current scene.

Annotations can also be attached to any 3D models you’ve added into your lesson. Move the annotation towards the 3D model until the model highlights in green, indicating the annotation will attach. Any annotations attached to a model will move in tandem with the model, keeping their relative position. This enables users to tag particular parts of models with descriptions and guidance, useful if you provide the lesson to students to access directly.

Submit an issue

Consent for storing submitted data *

Thank you! Your submission has been received!
Oops! Something went wrong while submitting the form.
×

Overview

Annotations are a method of attaching notes to specific areas or models within your lesson. In the future, users will also be able to add audio and video clips to their annotations, enabling them to provide detailed descriptions or context to their 3D models.

Overview

Adding Annotations to your lesson

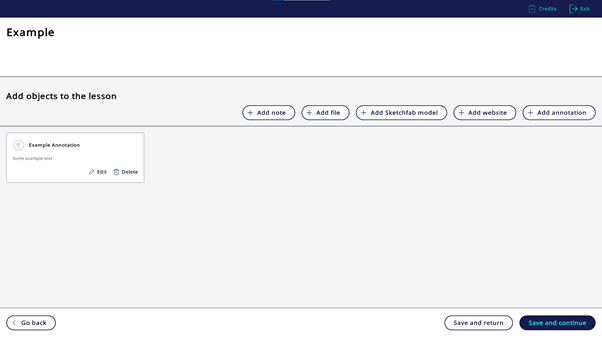
Annotations are added to your lesson from the lesson editing screen, before you enter the lesson itself, using the “Add Annotation” button. You will then be asked to enter a Title for the annotation to be known by, and a Message, which will display when the annotation is selected. When you are finished, press “Add” in the bottom right, and the annotation will be added to your lesson.
Adding Annotations to your lesson

Placing an annotation in your lesson

When you enter your lesson, you can access any annotations you’ve added by navigating to the “Annotations” tab on the home panel. Here you will see a list of your prepared annotations, filter them based upon whether they’ve been placed in the current scene or are hidden, and delete those you no longer want.

When you have found the annotation you want, you can use the “Place” button to add it to your scene. The annotation will appear in front of you (note, if you are facing the home panel or a wall, the annotation may appear on the other side, as it appears a set distance in front of you).

Placing an annotation in your lesson

Using an annotation

Annotations are interacted with in the same ways as 3D models. Users can grab the annotation using their grip buttons to move, scale and rotate. Pressing on the annotation pin causes the note to display, with the Title and Message that was entered when the annotation was created.
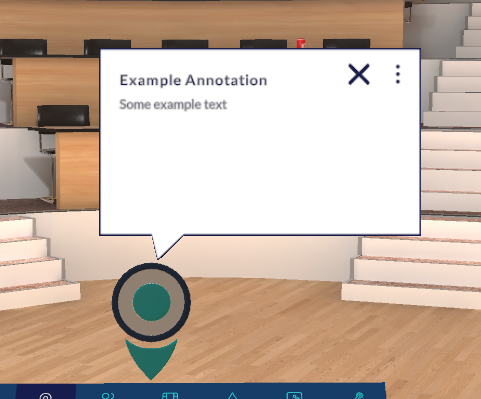
Pressing the Menu button (three dots) in the top right of the note popup opens the annotation’s context menu. Here, the user can access the annotation manipulation tools (if in desktop). They can also duplicate the annotation, temporarily hide it (while retaining its position), or completely remove it from the current scene.
Annotations can also be attached to any 3D models you’ve added into your lesson. Move the annotation towards the 3D model until the model highlights in green, indicating the annotation will attach. Any annotations attached to a model will move in tandem with the model, keeping their relative position. This enables users to tag particular parts of models with descriptions and guidance, useful if you provide the lesson to students to access directly.

Using an annotation

Can't find what you're looking for?

No problem! We're here to help.
Submit a ticket, and we'll get back to you as soon as possible.
Submit a Ticket